


What Are Shooting Tents and How Do They Work
Shooting tents transform product photography by controlling light, eliminating harsh shadows, and creating professional studio results without a dedicated studio space. These collapsible light boxes work with any camera, flash, or continuous light source, making them essential tools for e-commerce photography, jewelry documentation, collectibles imaging, and tabletop product shots.
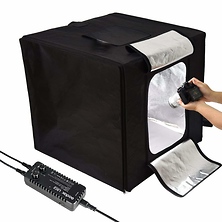
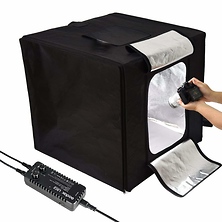
A shooting tent (also called a light box or light tent) is a collapsible cube or rectangular enclosure with translucent white nylon walls that diffuse light evenly around your subject. You place your product inside, position lights outside the tent, and shoot through a camera-access opening. The white translucent walls bounce and soften light, eliminating harsh shadows and creating even illumination across all sides of the product.
Shooting tents come in various sizes, from compact mini cubes for small jewelry and collectibles to larger boxes for apparel and electronics. The collapsible design allows you to pack them flat for storage or transport, making them practical for home studios, on-location shoots, and professional photographers.
Key Benefits of Using a Shooting Tent
The primary advantage is consistency. Once you position your lights and tent, every product shot receives the same quality of light and shadow reduction, critical for e-commerce catalogs where visual consistency affects brand perception. The white interior surfaces act as natural reflectors, filling in shadows without expensive reflector stands.
Shooting tents also provide speed. Setup takes minutes, and lighting adjustments are minimal since the tent itself diffuses and balances light. For photographers shooting dozens of items per session, this efficiency directly impacts productivity. The collapsible construction means portability; you can move your tent studio to different locations without permanent disassembly.
- Collapsible design for compact storage and transport
- Even, shadow-free lighting without multiple light sources
- Increased productivity for batch product photography
- Compatible with flash, continuous lights, and natural light
- Works with any camera type (DSLR, mirrorless, point-and-shoot)
- Simple entry point to professional lighting control
- Reduces post-processing retouching time
Shooting Tent Sizes
Mini shooting tents (40cm or smaller) suit jewelry, watches, small collectibles, and tabletop products. Medium tents (60-80cm) work for apparel, shoes, books, and mid-sized electronics. Large tents (100cm and above) accommodate full-body mannequins and larger appliances. Your choice depends on the product category you photograph most frequently.
Lighting Setup Inside a Shooting Tent
Light placement is simple but important. Position your main light (key light) at a 45-degree angle to the tent opening. Add a secondary light on the opposite side or place a reflector to fill shadows. The white interior surfaces bounce light throughout the space, reducing the number of light sources needed. A single strobe with a reflector, or two continuous LED panels, typically produces excellent results.
- Position key light at 45-degree angle
- Use fill light or reflector on opposite side
- Place lights 30-60cm from tent for even diffusion
- Test with preview shots to check lighting
Who Uses Shooting Tents
E-commerce product photographers use shooting tents for online catalog work, creating consistent product images for retail websites. The controlled environment ensures matching color temperature and shadow treatment. Jewelry and collectibles photographers rely on tents to capture detail without harsh reflections, while brand teams use them for packaging shots and promotional content.
Features and Setup
Quality shooting tents have evenly woven white nylon with no holes or thin spots. Frames range from spring-tension rods (lightweight, easy to collapse) to velcro-mounted rods (more permanent for frequent use). Look for tents with removable panels on multiple sides, allowing you to position cameras at different angles. Side and top openings enable overhead shots and varied compositions.
Mini Tents and Full-Size Boxes
Mini tents occupy minimal desk space and suit small products like jewelry and watches. They're compact and portable, though limited in space for complex styling. Full-size tents offer more room for larger products and multiple angles, but require more storage space and additional lighting. Many photographers own both: a mini tent for high-volume small items and a larger tent for apparel and lifestyle shots.
Shooting Tent Photography Workflow
Place the tent on a sturdy table at a comfortableat comfortable working height (80-90cm off the ground). Mount lights to light stands and position them consistently. Use white foam core as permanent fill. This standardized setup minimizes adjustments between products. Use aperture priority mode (f/5.6 to f/11) for depth of field. Set a custom white balance by photographing a white card inside the lit tent with your shooting lights to ensure accurate color across your catalog.
Frequently Asked Questions
What size shooting tent should I buy?
Size depends on your main product category. For jewelry and items under 10cm, a 40cm mini tent suffices. For apparel, books, and mid-sized electronics, choose 60-80cm. For larger items or varied product types, select 100cm or larger. A medium (60-80cm) tent provides flexibility across most product types.
Can I use natural light inside a shooting tent?
Yes, natural light works well. Position the tent near a north-facing window or diffuse direct sunlight. Natural light offers beautiful color but changes throughout the day. For consistent, repeatable results across large catalogs, controlled artificial lighting (strobe or continuous LED) is more practical.
What lighting do I need for shooting tent photography?
No special lighting is required. Any strobe, continuous LED, or on-camera flash works. The tent diffusion does the heavy lifting. However, two lights or one light plus a reflector produces more professional results. Continuous LED lights let you see the lighting effect in real time, while strobes offer more power for high-volume work.
How do I prevent light leaks and unwanted reflections?
Keep the camera opening minimal. Position your lens close to the opening so less ambient light enters around the sides. For unwanted reflections on shiny products, reposition lights or add black cloth flags to block reflected light.
What backgrounds work best with shooting tents?
White seamless paper or fabric is traditional for e-commerce, creating a clean, minimal look. Colored backgrounds (gray, navy, cream) work for branded catalogs. Textured backgrounds (burlap, wood, concrete) add lifestyle appeal. Many photographers keep multiple background rolls mounted inside the tent.
Can I shoot video inside a shooting tent?
Yes, shooting tents work for video content and product demonstrations. The consistent, shadow-free lighting is ideal for detail shots. Use a tripod and continuous LED lighting for steady, flicker-free video. Lock your shutter speed at 1/50 or 1/60 depending on your frame rate.
Shop Shooting Tents at Samy's Camera
Shooting tents are portable, practical solutions for professional product photography. Whether you're photographing jewelry for an online store, building a catalog of collectibles, or creating lifestyle content, a shooting tent gives you studio-quality control without a dedicated studio. Browse our selection of shooting tents and discover how much time and retouching effort a simple light box can save. Visit our photography section for additional lighting and camera equipment to complete your setup.