

We've all done it. We get home after a long trip abroad or after a few dives on a local dive boat, we upload our photos, and... *dang it.* "Had I only been closer and spent more time with that *insert awesome subject*, that shot would have been perfect!" Underwater photography is a journey, and every dive provides a chance for us to learn from our mistakes. Here, in addition to sharing a few of the mistakes I have made along the way, I will also some tips to help remedy those mistakes.
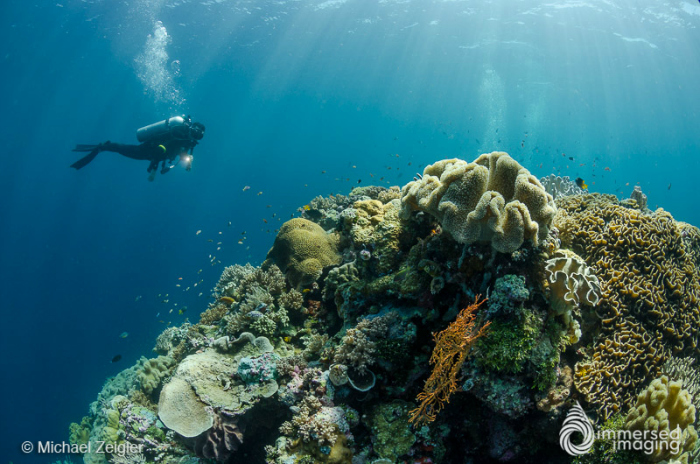
[caption id="attachment_1438" align="aligncenter" width="800"]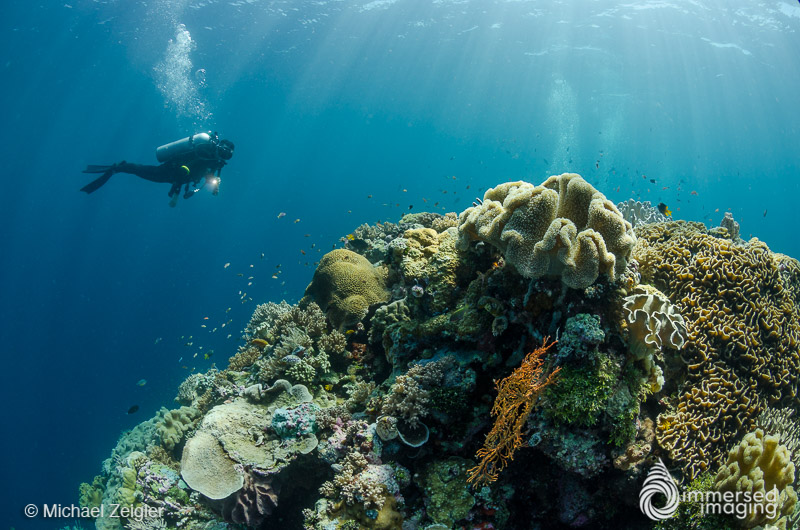 Beautiful place for a safety stop. The Blade - Wakatobi.[/caption]
Buoyancy control is a cornerstone to better image making (and being a better model).
Firstly, before taking a camera beneath the waves, it is my personal opinion that you have the attributes of a good diver: great buoyancy control, navigation skills, pre-dive planning, and the other aspects you've learned throughout your scuba training. I cannot emphasize this enough.
Beautiful place for a safety stop. The Blade - Wakatobi.[/caption]
Buoyancy control is a cornerstone to better image making (and being a better model).
Firstly, before taking a camera beneath the waves, it is my personal opinion that you have the attributes of a good diver: great buoyancy control, navigation skills, pre-dive planning, and the other aspects you've learned throughout your scuba training. I cannot emphasize this enough.
Top 5 Tips for New Underwater Photographers
#1: Get Close I would have to say that by far the #1 mistake made by new underwater photographers (and seasoned photographers for that matter) is not getting close enough. You've heard it before. Get close, then get closer. There are several good reasons for this. [caption id="attachment_1442" align="aligncenter" width="800"]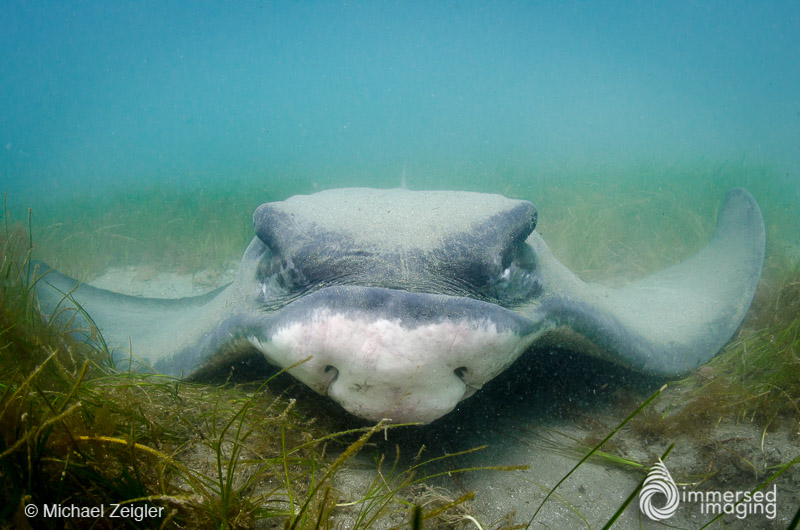 Huge bat rays gather in the sandy shallows to feast on crustaceans, mollusks, and small fish. This particular ray had a wingspan of at least four feet.[/caption]
Resting on the sand, I was able to slowly approach this large bat ray until I was just a few inches from its face.
Getting close to your subject minimizes the amount of water you're shooting through, and therefore improves the color, saturation, and contrast of your photos. In addition, your strobes are more effective the closer they are to the subject.
#2: Have Patience
It's so easy to see a great subject, focus, fire, and move on. This is often referred to as the "happy snappy" approach. The next time you see a subject with great potential (e.g. sitting proudly on the reef, great negative space, cool behavior, etc.), I would encourage you to take a deep breath, take note of your air supply and remaining bottom time, and take some time shooting the subject.
[caption id="attachment_1443" align="aligncenter" width="534"]
Huge bat rays gather in the sandy shallows to feast on crustaceans, mollusks, and small fish. This particular ray had a wingspan of at least four feet.[/caption]
Resting on the sand, I was able to slowly approach this large bat ray until I was just a few inches from its face.
Getting close to your subject minimizes the amount of water you're shooting through, and therefore improves the color, saturation, and contrast of your photos. In addition, your strobes are more effective the closer they are to the subject.
#2: Have Patience
It's so easy to see a great subject, focus, fire, and move on. This is often referred to as the "happy snappy" approach. The next time you see a subject with great potential (e.g. sitting proudly on the reef, great negative space, cool behavior, etc.), I would encourage you to take a deep breath, take note of your air supply and remaining bottom time, and take some time shooting the subject.
[caption id="attachment_1443" align="aligncenter" width="534"]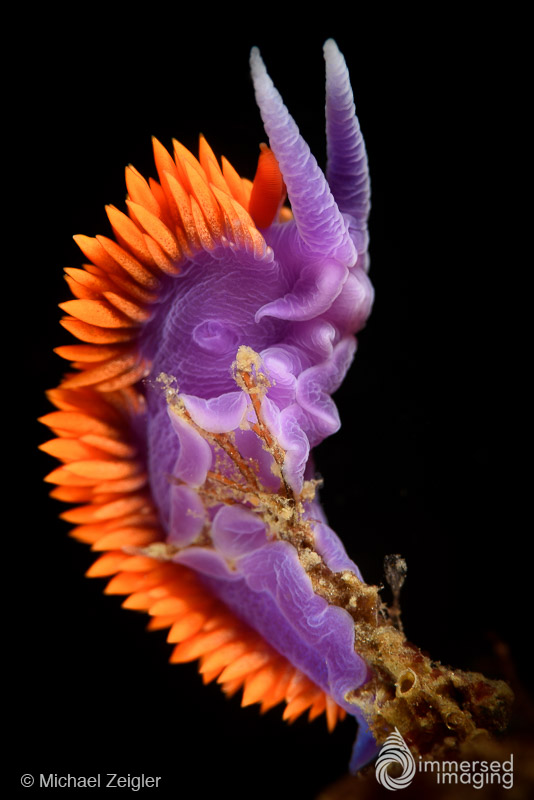 Flabellina iodinea nudibranch near the wreck of the Avalon. Palos Verdes, California.[/caption]
This wreck was covered with these nudibranchs, but this was the only one I saw that had great negative space behind it. I also happened to see it during the last 5 minutes of my dive. Totally worth the wait!
The place where you first see your subject may not be the best place from which to take the best photograph. "Work" your subject. When you think you have "the shot," take one more. There's a reason you have a large memory card in your camera.
#3: Shoot Up
There are few things that separate a decent underwater photo from a great underwater photo more than by shooting up. Getting down at eye level (or lower) with a subject allows the viewer to get a much better sense of connection with the subject or scene. It also, amongst other things, helps you separate the subject from some of the distracting background environment.
[caption id="attachment_1440" align="aligncenter" width="534"]
Flabellina iodinea nudibranch near the wreck of the Avalon. Palos Verdes, California.[/caption]
This wreck was covered with these nudibranchs, but this was the only one I saw that had great negative space behind it. I also happened to see it during the last 5 minutes of my dive. Totally worth the wait!
The place where you first see your subject may not be the best place from which to take the best photograph. "Work" your subject. When you think you have "the shot," take one more. There's a reason you have a large memory card in your camera.
#3: Shoot Up
There are few things that separate a decent underwater photo from a great underwater photo more than by shooting up. Getting down at eye level (or lower) with a subject allows the viewer to get a much better sense of connection with the subject or scene. It also, amongst other things, helps you separate the subject from some of the distracting background environment.
[caption id="attachment_1440" align="aligncenter" width="534"]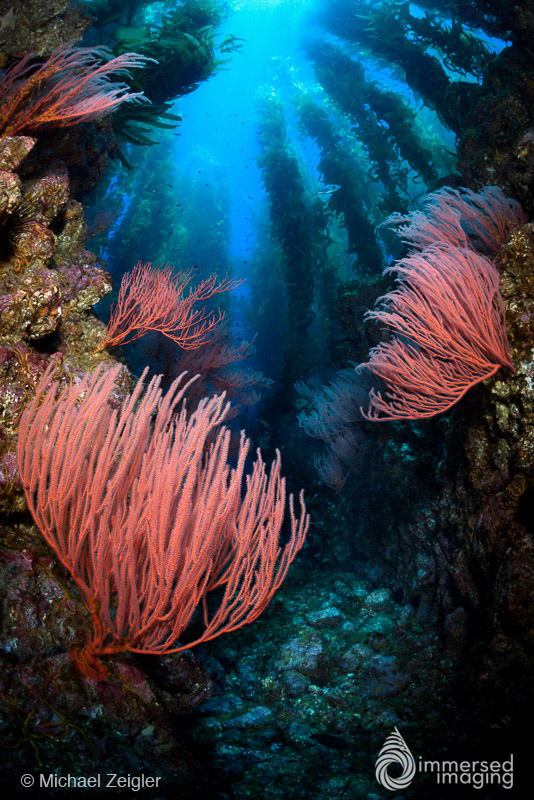 Red gorgonian sea fans line deep channels at Sutil Island, a small island near the coast of Santa Barbara Island, California.[/caption]
Red gorgonian sea fans line deep channels at Sutil Island, a small island near the coast of Santa Barbara Island, California. Shooting up allowed me to show the viewer the vastness of this amazing dive site.
Not every subject or scene (read: most) will allow you to get down and shoot up. Be mindful of your surrounding environment when considering to engage a subject. It's often best to move on and search for a subject more suited for shooting up.
Tip: Seek out reef heads surrounded by *unoccupied* sand, which will allow you search for subjects higher on the reef, while being able to get down low on the sand and shoot up.
#4: Move Your Strobes
It's way too easy to set your strobe(s) to one position at the beginning of the dive and leave them there for the entire dive. Most, if not all arm systems have adjustable segments that allow for easy movement of the strobes. Take advantage of that, as each subject you encounter will likely benefit from different lighting than the previous subject.
#5: Shoot Vertically
Just like #4, it's easy to just shoot horizontal photos all day. Ask yourself this question when you're approaching a subject: which camera orientation would best portray this subject/scene? Besides, if you ever have aspirations to get one of your photos on the cover of a magazine, they're mostly vertical shots!
[caption id="attachment_1439" align="aligncenter" width="534"]
Red gorgonian sea fans line deep channels at Sutil Island, a small island near the coast of Santa Barbara Island, California.[/caption]
Red gorgonian sea fans line deep channels at Sutil Island, a small island near the coast of Santa Barbara Island, California. Shooting up allowed me to show the viewer the vastness of this amazing dive site.
Not every subject or scene (read: most) will allow you to get down and shoot up. Be mindful of your surrounding environment when considering to engage a subject. It's often best to move on and search for a subject more suited for shooting up.
Tip: Seek out reef heads surrounded by *unoccupied* sand, which will allow you search for subjects higher on the reef, while being able to get down low on the sand and shoot up.
#4: Move Your Strobes
It's way too easy to set your strobe(s) to one position at the beginning of the dive and leave them there for the entire dive. Most, if not all arm systems have adjustable segments that allow for easy movement of the strobes. Take advantage of that, as each subject you encounter will likely benefit from different lighting than the previous subject.
#5: Shoot Vertically
Just like #4, it's easy to just shoot horizontal photos all day. Ask yourself this question when you're approaching a subject: which camera orientation would best portray this subject/scene? Besides, if you ever have aspirations to get one of your photos on the cover of a magazine, they're mostly vertical shots!
[caption id="attachment_1439" align="aligncenter" width="534"]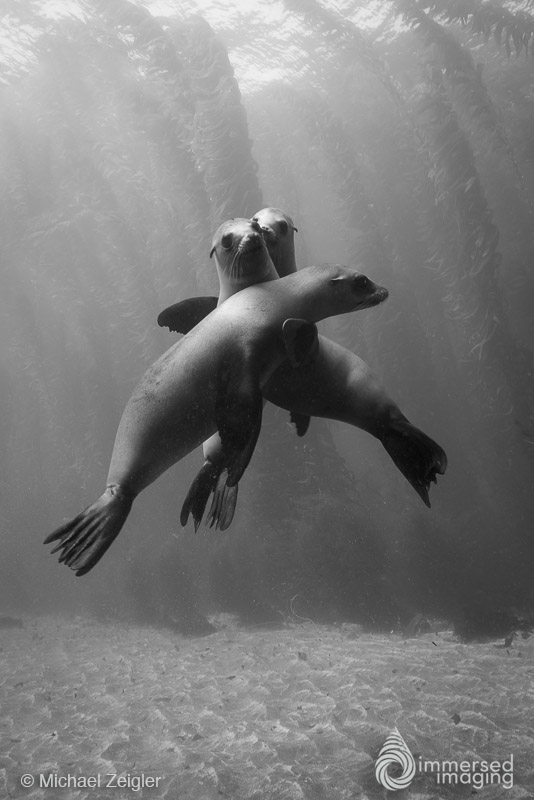 Playful sea lion pups near the rookery at Santa Barbara Island, California.[/caption]
