


By Michael Zeigler and Todd Winner
Adobe recently rolled out their 2015 update to the Creative Cloud suite of products. Amongst a myriad of enhancements and performance boosts is the Dehaze effect. Also included in Photoshop, the Dehaze feature in Lightroom lets you eliminate fog and haze from your images ... and it even works for underwater images! In addition, you can also add haze for an artistic effect.
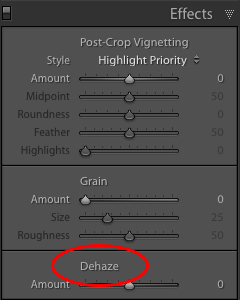 In the Lightroom Development Module, the Dehaze slider can be found at the bottom of the Effects Panel.
We took a few images and tested out this new feature in Lightroom CC. The results are impressive, and we will most likely be adding this tool to our workflow with some images. Just like all of the other great tools in Lightroom however, it is really easy to over do it. A little goes a long way!
In the Lightroom Development Module, the Dehaze slider can be found at the bottom of the Effects Panel.
We took a few images and tested out this new feature in Lightroom CC. The results are impressive, and we will most likely be adding this tool to our workflow with some images. Just like all of the other great tools in Lightroom however, it is really easy to over do it. A little goes a long way!
 The image on the left is SOOC (straight out of camera) without any post processing in Lightroom. Nikon D810, Nikon 16-35 ƒ/4 lens in a Sea & Sea housing. 1/160, ƒ/8, ISO 800, ambient light. This image on the right was processed only with the Dehaze slider (+38).
You can see more contrast, increased clarity, and a bit of vibrance added to the image on the right using just the Dehaze slider.
The image on the left is SOOC (straight out of camera) without any post processing in Lightroom. Nikon D810, Nikon 16-35 ƒ/4 lens in a Sea & Sea housing. 1/160, ƒ/8, ISO 800, ambient light. This image on the right was processed only with the Dehaze slider (+38).
You can see more contrast, increased clarity, and a bit of vibrance added to the image on the right using just the Dehaze slider.
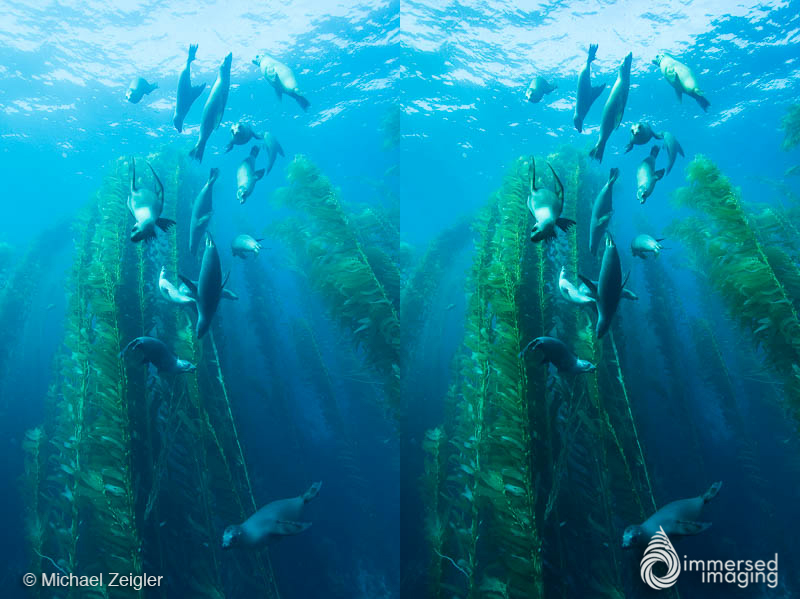
 This image was processed using global changes to white balance and increased contrast only. This was processed with the global changes as above with the addition of the Dehaze slider (+33). It's a nice effect!
Although the image on the left (above) is acceptable in my opinion, the image on the right with a little Dehaze added really enhances the sea lions, and makes them "pop" a bit more.
This image was processed using global changes to white balance and increased contrast only. This was processed with the global changes as above with the addition of the Dehaze slider (+33). It's a nice effect!
Although the image on the left (above) is acceptable in my opinion, the image on the right with a little Dehaze added really enhances the sea lions, and makes them "pop" a bit more.
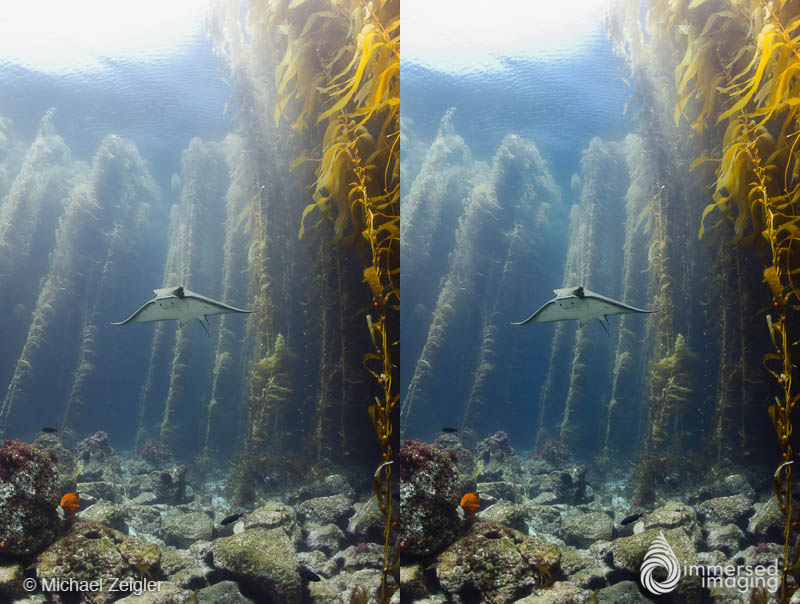 The image on the left is was my final edit before the introduction of the Dehaze tool. The image on the right has a Dehaze of +23, which is just enough to make the bat ray stand out more against the backdrop of kelp. I notice the effect the most at the surface and in the kelp forest to the left of the bat ray.
For my examples I was really interested to see what could be done using only the Dehaze effect. I have pushed the effect so you can clearly see a before and after. This is not how I would normally edit an image in Lightroom but I think it gives you a very good idea of what the effect is capable of. All of the images are straight out of the camera and the only adjustment is the Dehaze effect.
The image on the left is was my final edit before the introduction of the Dehaze tool. The image on the right has a Dehaze of +23, which is just enough to make the bat ray stand out more against the backdrop of kelp. I notice the effect the most at the surface and in the kelp forest to the left of the bat ray.
For my examples I was really interested to see what could be done using only the Dehaze effect. I have pushed the effect so you can clearly see a before and after. This is not how I would normally edit an image in Lightroom but I think it gives you a very good idea of what the effect is capable of. All of the images are straight out of the camera and the only adjustment is the Dehaze effect.
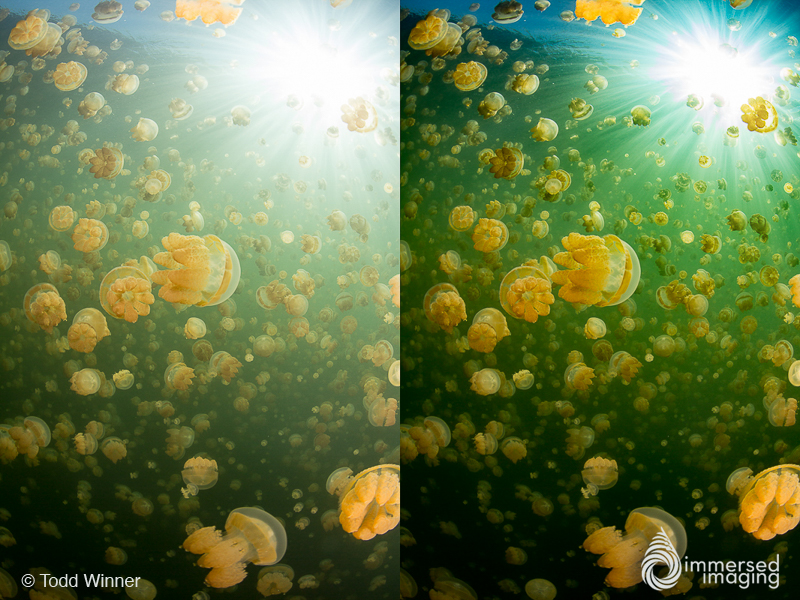 This example from jellyfish lake shows an extreme push of +80 with the Dehaze effect.Canon 5D Mark III, Canon EF 8-15mm Fisheye Lens, 1/200, f/11, ISO 160
The Dehaze effect seems to add a combination of contrast, color, and sharpening. I would not normally adjust an image using only one slider but the effect is quite dramatic. Be careful if your image includes bright highlights like sunbursts, It can add a lot of banding around those areas in the image.
This example from jellyfish lake shows an extreme push of +80 with the Dehaze effect.Canon 5D Mark III, Canon EF 8-15mm Fisheye Lens, 1/200, f/11, ISO 160
The Dehaze effect seems to add a combination of contrast, color, and sharpening. I would not normally adjust an image using only one slider but the effect is quite dramatic. Be careful if your image includes bright highlights like sunbursts, It can add a lot of banding around those areas in the image.
 This soft coral from Truk Lagoon has a +50 Dehaze push. My goal for this tests was to see how far I could push the adjustment before it fell apart. When I pushed the effect further on this image the contrast and color saturation got too extreme. Nikon D2X, Tokina 10-17mm Lens @10mm, 1/250, f/7.1, ISO 100
For images that already have a fair amount of contrast the effect is less dramatic but it still adds a nice pop. One nice feature is that it seems to add much less noise than when you crank the clarity slider up.
This soft coral from Truk Lagoon has a +50 Dehaze push. My goal for this tests was to see how far I could push the adjustment before it fell apart. When I pushed the effect further on this image the contrast and color saturation got too extreme. Nikon D2X, Tokina 10-17mm Lens @10mm, 1/250, f/7.1, ISO 100
For images that already have a fair amount of contrast the effect is less dramatic but it still adds a nice pop. One nice feature is that it seems to add much less noise than when you crank the clarity slider up.
 This image has some pretty big problems to begin with. Shooting through too much water and I have a lot of strobe light hitting the water between the camera and subject adding to the haze. With only using the Dehaze slider I was able to pull much more detail out of the fish.
Again I wouldn't normally make all of my final adjustments using only one slider but I wanted to see what it could do for this image. It certainly makes the school of fish stand out but it also adds too much contrast to the final image. Using the Dehaze effect with a lighter touch and in combination with the other adjustments in Lightroom will certainly yield some amazing results.
This image has some pretty big problems to begin with. Shooting through too much water and I have a lot of strobe light hitting the water between the camera and subject adding to the haze. With only using the Dehaze slider I was able to pull much more detail out of the fish.
Again I wouldn't normally make all of my final adjustments using only one slider but I wanted to see what it could do for this image. It certainly makes the school of fish stand out but it also adds too much contrast to the final image. Using the Dehaze effect with a lighter touch and in combination with the other adjustments in Lightroom will certainly yield some amazing results.
 Michael Zeigler is a contributor, instructor, and trip leader for Samy’s Underwater Photo & Video as well as an AAUS Scientific Diver. More of Michael’s underwater photography can be seen at www.seainfocus.com. For the latest information on workshops and trips, sign up for our newsletter.
 Todd Winner is a contributor, instructor, and trip leader for Samy’s Underwater Photo & Video and has over 20 years of experience in underwater still and broadcast video. To see more of Todd’s work please go to www.toddwinner.com. For the latest information on workshops and trips, sign up for our newsletter.
In the Lightroom Development Module, the Dehaze slider can be found at the bottom of the Effects Panel.
We took a few images and tested out this new feature in Lightroom CC. The results are impressive, and we will most likely be adding this tool to our workflow with some images. Just like all of the other great tools in Lightroom however, it is really easy to over do it. A little goes a long way!
Test Images
The series of images below show an extended before and after processing with the new Dehaze feature in Adobe Lightroom CC.
The image on the left is SOOC (straight out of camera) without any post processing in Lightroom. Nikon D810, Nikon 16-35 ƒ/4 lens in a Sea & Sea housing. 1/160, ƒ/8, ISO 800, ambient light. This image on the right was processed only with the Dehaze slider (+38).
You can see more contrast, increased clarity, and a bit of vibrance added to the image on the right using just the Dehaze slider.
This image was processed using global changes to white balance and increased contrast only. This was processed with the global changes as above with the addition of the Dehaze slider (+33). It's a nice effect!
Although the image on the left (above) is acceptable in my opinion, the image on the right with a little Dehaze added really enhances the sea lions, and makes them "pop" a bit more.
The image on the left is was my final edit before the introduction of the Dehaze tool. The image on the right has a Dehaze of +23, which is just enough to make the bat ray stand out more against the backdrop of kelp. I notice the effect the most at the surface and in the kelp forest to the left of the bat ray.
For my examples I was really interested to see what could be done using only the Dehaze effect. I have pushed the effect so you can clearly see a before and after. This is not how I would normally edit an image in Lightroom but I think it gives you a very good idea of what the effect is capable of. All of the images are straight out of the camera and the only adjustment is the Dehaze effect.
This example from jellyfish lake shows an extreme push of +80 with the Dehaze effect.Canon 5D Mark III, Canon EF 8-15mm Fisheye Lens, 1/200, f/11, ISO 160
The Dehaze effect seems to add a combination of contrast, color, and sharpening. I would not normally adjust an image using only one slider but the effect is quite dramatic. Be careful if your image includes bright highlights like sunbursts, It can add a lot of banding around those areas in the image.
This soft coral from Truk Lagoon has a +50 Dehaze push. My goal for this tests was to see how far I could push the adjustment before it fell apart. When I pushed the effect further on this image the contrast and color saturation got too extreme. Nikon D2X, Tokina 10-17mm Lens @10mm, 1/250, f/7.1, ISO 100
For images that already have a fair amount of contrast the effect is less dramatic but it still adds a nice pop. One nice feature is that it seems to add much less noise than when you crank the clarity slider up.
This image has some pretty big problems to begin with. Shooting through too much water and I have a lot of strobe light hitting the water between the camera and subject adding to the haze. With only using the Dehaze slider I was able to pull much more detail out of the fish.
Again I wouldn't normally make all of my final adjustments using only one slider but I wanted to see what it could do for this image. It certainly makes the school of fish stand out but it also adds too much contrast to the final image. Using the Dehaze effect with a lighter touch and in combination with the other adjustments in Lightroom will certainly yield some amazing results.
Michael Zeigler is a contributor, instructor, and trip leader for Samy’s Underwater Photo & Video as well as an AAUS Scientific Diver. More of Michael’s underwater photography can be seen at www.seainfocus.com. For the latest information on workshops and trips, sign up for our newsletter.
Todd Winner is a contributor, instructor, and trip leader for Samy’s Underwater Photo & Video and has over 20 years of experience in underwater still and broadcast video. To see more of Todd’s work please go to www.toddwinner.com. For the latest information on workshops and trips, sign up for our newsletter.
